Every place I've worked, I've picked up tricks for a more efficient workflow. During my time assisting Sarah Pelsoh with the DIY Studio at MAM After Dark, I mastered how to create projects for a large quantity of guests on a very little budget. Resourcefulness is a skill needed by every artist. I also learned great organizational skills for an Arts Educator at the Racine Art Museum. All the supplies was grouped, labeled, easily accessible and visible. The supply closets at RAM's Wustum Education Wing are a desirable dream after bouncing around from different workplaces.
I am taking it upon myself to organize the supplies at my current work place on a $0 budget. Starting with the crayons which are in two deep buckets. For 6 tables, the crayons are usually tossed in piles in front of the children while a handful end up on the floor and get stepped on. When it's time to clean up, the crayons usually get thrown across the room.
I started handing the children plastic bags and assigned them each a color to pick up. Even the rowdiest children respond well to this. It helps focus their energy in a positive way.
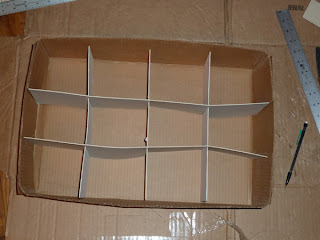
Now that I have all the colors separated I need a useful boxes for future use. I ended up making 6 divided boxes out of copy paper box lids, scrap mat board, and duck tape.
First I measured the the box.
11.5" x 17.5" x 4"
Then I cut 3 pieces (per box) of mat board for the width.
11.5" x 3.5"
And 2 pieces (per box) of mat board of the length.
17.5" x 4"
I made the length pieces half an inch taller than the width pieces so I can wedge them together nicely later.
Next step: Cut 3 hash marks evenly spaced along the longer length pieces leaving a half inch on top.
Draw a 3.5" line at 8.75" middle mark Also Draw and 3.5" line 4.375" and 13.125" quarter sections.
Cut along the lines.
Evenly space and wedge the width pieces inside the hash marks on the length pieces to create a compartmental grid.
Snuggle grid inside copy paper box lid. Make adjustments as necessary.
Then reinforce compartments with duck tape.


